前回、Cluster API Provider vSphereを使ってKubernetesクラスタを作成してみました。今回は、Cluster API Provider vSphereとArgo CDを使ってKubernetesクラスタを管理する方法を試してみたいと思います。
構成
- vCenter 7.0 U3
- ESXi 7.0 Update 3
- Kubespray
- kubernetes v1.25.5
- Cluster API v1.3.2
- Argo CD v2.6.0
Argo CDについて
Argo CD は、Kubernetes のための宣言的な GitOps 継続的デリバリーツールです。GitOpsパターンに従って、望ましいアプリケーション状態を定義するための信頼できる情報源(source of truth)として Git リポジトリを使用します。
Argo CDで利用できるファイルは以下のようなものがあります。
- kustomize
- helmチャート
- jsonnetファイル
- manifestsファイル
Gitリポジトリに、アプリケーションの定義ファイルを用意しておくことで、クラスタに自動デプロイすることができます。
Cluster APIとArgo CDを組み合わせて使うことで、Kubernetesクラスタの管理とアプリケーションの管理をGitリポジトリで一元管理することができるようになります。
Argo CDのインストール
前回作成した、management clusterに以下のようにArgo CDをインストールします。
$ kubectl create namespace argocd
$ kubectl apply -n argocd -f https://raw.githubusercontent.com/argoproj/argo-cd/stable/manifests/install.yaml
以下のように、Argo CD CLI をダウンロードします。
$ curl -sSL -o argocd-linux-amd64 https://github.com/argoproj/argo-cd/releases/latest/download/argocd-linux-amd64
$ sudo install -m 555 argocd-linux-amd64 /usr/local/bin/argocd
$ rm argocd-linux-amd64
デフォルトだと、Argo CD API サーバーは外部 IPで公開されていないため、API サーバーにアクセスするためにIngressを設定します。
$ vi ingress.yaml
apiVersion: networking.k8s.io/v1
kind: Ingress
metadata:
  name: argocd-server-ingress
  namespace: argocd
  annotations:
    kubernetes.io/ingress.class: "nginx"
    kubernetes.io/tls-acme: "true"
    nginx.ingress.kubernetes.io/force-ssl-redirect: "true"
    nginx.ingress.kubernetes.io/backend-protocol: "HTTPS"
spec:
  tls:
  - hosts:
      - argocd.kube.home.lab
    secretName: ingress-tls
  rules:
  - host: argocd.kube.home.lab
    http:
      paths:
      - path: /
        pathType: Prefix
        backend:
          service:
            name: argocd-server
            port:
              name: https
$ kubectl apply -f ingress.yaml
ブラウザから https://argocd.kube.home.lab にアクセスできることを確認します。
ブラウザでパスワードが求めれるため、以下のコマンドでパスワードを取得します。
$ kubectl -n argocd get secret argocd-initial-admin-secret -o jsonpath="{.data.password}" | base64 -d; echo
以下のように、CLI を使用してログインします。
$ argocd login argocd.kube.home.lab
動作確認
Argo CDのリポジトリにguestbookというアプリケーションが用意されているため、こちらを使って動作確認を行ってみます。
以下のコマンドでアプリケーションの登録を行ってみます。
$ argocd app create guestbook --repo https://github.com/argoproj/argocd-example-apps.git --path guestbook --dest-server https://kubernetes.default.svc --dest-namespace default
guestbookのアプリケーションは自動同期の設定がされていないため、アプリケーションの登録後に以下のように同期を行います。同期を行うことで、リポジトリからマニフェストを取得し、kubectl applyマニフェストを実行します。
$ argocd app sync guestbook
Health StatusがHealthyとなっており、正常に同期されたことが分かります。
$ argocd app get guestbook
Name:               argocd/guestbook
Project:            default
Server:             https://kubernetes.default.svc
Namespace:          default
URL:                https://argocd.kube.home.lab/applications/guestbook
Repo:               https://github.com/argoproj/argocd-example-apps.git
Target:
Path:               guestbook
SyncWindow:         Sync Allowed
Sync Policy:        <none>
Sync Status:        Synced to  (53e28ff)
Health Status:      Healthy
プライベートリポジトリの登録
Argo CDを利用するために、Gitリポジトリが必要なため、プライベートリポジトリとしてBitbucketのリポジトリを用意します。
BitbucketのPersonal settingsでSSH keysにsshの公開鍵を登録しておきます。
以下のように、sshの秘密鍵を利用し、プライベートリポジトリを登録します。
$ argocd repo add git@bitbucket.org:<username>/argocd-apps.git --ssh-private-key-path ~/.ssh/id_rsa
リポジトリにマニフェストファイルを追加
$ tree
.
├── app
│   └── workload-nginx-app.yaml
├── capi-cluster
│   └── cluster.yaml
├── management
│   └── capi-cluster-app.yaml
├── README.md
└── workload
    └── nginx
        ├── deployment.yaml
        └── service.yaml
ファイルについて解説していきます。
こちらは、Argro CDのApplicationを追加するマニフェストファイルになります。動作確認では、argocdコマンドで行っていましたが、マニフェストファイルでも管理することができます。management clusterにデプロイする形となります。
$ vi management/capi-cluster-app.yaml
apiVersion: argoproj.io/v1alpha1
kind: Application
metadata:
  name: capi-cluster
  namespace: argocd
spec:
  destination:
    namespace: default
    server: 'https://kubernetes.default.svc'
  source:
    path: capi-cluster
    repoURL: 'git@bitbucket.org:<username>/argocd-apps.git'
    targetRevision: HEAD
  project: default
  syncPolicy:
    automated: {}
capi-cluster/cluster.yamlには、clusterctl で生成したworkload clusterのcluster.yamlの中身をそのまま貼り付けます。
$ clusterctl generate cluster vsphere-quickstart \
    --infrastructure vsphere \
    --kubernetes-version v1.25.5 \
    --control-plane-machine-count 1 \
    --worker-machine-count 3 > cluster.yaml
こちらは、動作確認用のnginxのサービスをworkload clusterへデプロイするための、Argro CDのApplicationのマニフェストファイルになります。
serverには、workload clusterのcontrole planeのエンドポイントのURLを指定しておきます。
$ vi app/workload-nginx-app.yaml
apiVersion: argoproj.io/v1alpha1
kind: Application
metadata:
  name: nginx
  namespace: argocd
spec:
  destination:
    namespace: default
    server: 'https://10.0.50.40:6443'
  source:
    path: workload/nginx
    repoURL: 'git@bitbucket.org:<username>/argocd-apps.git'
    targetRevision: HEAD
  project: default
  syncPolicy:
    automated: {}
動作確認用のnginxのサービスの設定になります。
$ vi workload/nginx/deployment.yaml
apiVersion: apps/v1
kind: Deployment
metadata:
  labels:
    app: nginx
  name: nginx
spec:
  replicas: 1
  selector:
    matchLabels:
      app: nginx
  template:
    metadata:
      labels:
        app: nginx
    spec:
      containers:
      - image: nginx
        name: nginx
        ports:
        - containerPort: 80
$ vi workload/nginx/service.yaml
apiVersion: v1
kind: Service
metadata:
  labels:
    app: nginx
  name: nginx
spec:
  ports:
  - port: 80
    protocol: TCP
    targetPort: 80
  selector:
    app: nginx
workload clusterのインストール
以下のコマンドで、workload clusterをインストールするための、Argo CDのApplicationを設定します。
$ kubectl apply -f management/capi-cluster-app.yaml
Argo CDのUIかコマンドでCluster APIによりworkload clusterのインストールされている様子を確認します。
$ argocd app get argocd/capi-cluster
capi-clusterのステータスがProgressingのままとなっていますが、こちらはCNIのインストールが完了していたいためになります。
workload clusterにCNIのインストールを行います。
まずは、workload clusterにアクセスするためのconfigファイルを以下のように生成します。
$ clusterctl get kubeconfig vsphere-quickstart > vsphere-quickstart.kubeconfig
以下のようにcalicoをインストールします。
$ KUBECONFIG=vsphere-quickstart.kubeconfig kubectl apply -f https://raw.githubusercontent.com/projectcalico/calico/v3.25.0/manifests/calico.yaml
capi-clusterのステータスがHealthyとなれば、workload clusterのインストールの完了となります。
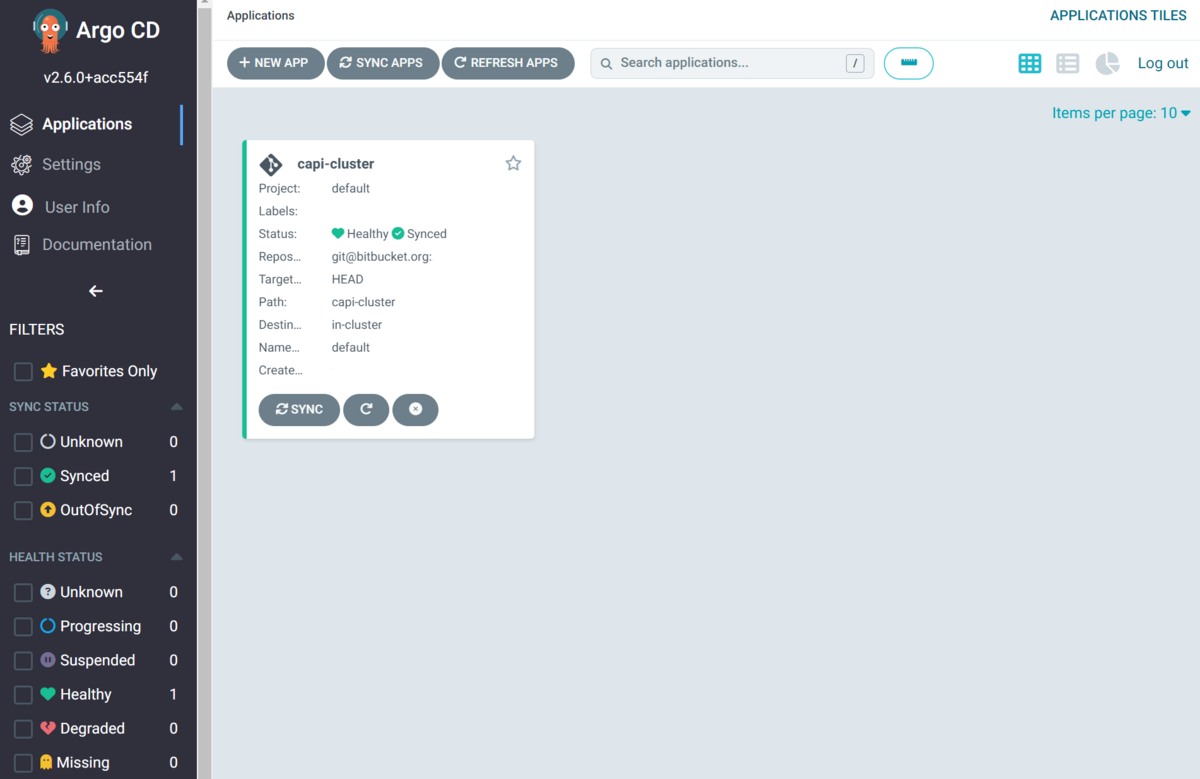
$ argocd app get argocd/nginx
Name:               argocd/capi-cluster
Project:            default
Server:             https://kubernetes.default.svc
Namespace:          default
URL:                https://argocd.kube.home.lab/applications/capi-cluster
Repo:               git@bitbucket.org:<username>/argocd-apps.git
Target:             HEAD
Path:               capi-cluster
SyncWindow:         Sync Allowed
Sync Policy:        Automated
Sync Status:        Synced to HEAD (1c29848)
Health Status:      Healthy
ArgoCDのUI上だと以下のように見えます。
workload clusterでの動作確認
ArgoCDでworkload clusterを扱えるようにするために、clusterの登録を行います。
workload clusterのコンテキスト名を取得します。
$ KUBECONFIG=vsphere-quickstart.kubeconfig kubectl config get-contexts
CURRENT   NAME                                          CLUSTER              AUTHINFO                   NAMESPACE
*         vsphere-quickstart-admin@vsphere-quickstart   vsphere-quickstart   vsphere-quickstart-admin
以下のようにArgoCDにworkload clusterを新クラスタとして登録します。
$ argocd cluster add vsphere-quickstart-admin@vsphere-quickstart --insecure --kubeconfig ./vsphere-quickstart.kubeconfig
以下のコマンドで、動作確認用のnginxのサービスをworkload clusterへデプロイするための、Argro CDのApplicationを設定します。
$ kubectl apply -f app/workload-nginx-app.yaml
nginxのステータスがHealthyとなれば、nginxのインストールの完了となります。
$ argocd app get argocd/nginx
Name:               argocd/nginx
Project:            default
Server:             https://10.0.50.40:6443
Namespace:          default
URL:                https://argocd.kube.home.lab/applications/nginx
Repo:               git@bitbucket.org:<username>/argocd-apps.git
Target:             HEAD
Path:               workload/nginx
SyncWindow:         Sync Allowed
Sync Policy:        Automated
Sync Status:        Synced to HEAD (1c29848)
Health Status:      Healthy
おわりに
ArgoCDを使ってCluster APIを使ったKubernetesクラスタの管理を試してみました。ArgoCDへ作成したworkload clusterのクラスタ登録をどうやって自動で行うかなど課題がありますが、作りこんでいけば、CNIのインストールや、vSphere CSIの再インストールなども自動化して、Gitで管理できるようになるのではと思っています。