hidemium's blog

日々学んだことをアウトプットする。

ChefからDockerコンテナにSensu Serverをインストールする

前回、ChefからDockerコンテナ内の起動プロセスを追加することが確認できました。そこで、今回はChefを使ってDockerコンテナに監視ツールのSensu Serverをインストールしてみました。

構成

Ubuntu 12.04: サーバ構築対象
Ubuntu 12.04はDocker 1.0.0上で動作しています。

Dockerコンテナ

Dockerfileの構成は以下の通りです。

sshd
├──Dockerfile
├──sources.list      ... ミラーサイト一覧
├──id_rsa.pub        ... Chef workstationの公開鍵
└──supervisord.conf  ... supervisorの定義ファイル

Dockerfileを以下のように作成します。
supervisorの定義ファイルは、/etc/supervisor/conf.d/配下にも置くことができるので、「RUN mkdir -p /etc/supervisor/conf.d/」でディレクトリを作成しています。

$ vi Dockerfile
FROM ubuntu:12.04

MAINTAINER hidemium

# Ubuntu update
ADD sources.list /etc/apt/sources.list
RUN apt-get -y update

# Hack for initctl not being available in Ubuntu
RUN dpkg-divert --local --rename --add /sbin/initctl
RUN ln -sf /bin/true /sbin/initctl

# ssh install
RUN apt-get -y install openssh-server
RUN apt-get -y install python-setuptools
RUN apt-get clean
RUN easy_install supervisor

RUN mkdir /var/run/sshd
RUN echo 'root:root' | chpasswd

# sshd config
ADD id_rsa.pub /root/id_rsa.pub
RUN mkdir /root/.ssh/
RUN mv /root/id_rsa.pub /root/.ssh/authorized_keys
RUN chmod 700 /root/.ssh
RUN chmod 600 /root/.ssh/authorized_keys
RUN sed -i -e '/^UsePAM\s\+yes/d' /etc/ssh/sshd_config

# supervisor config
RUN mkdir -p /var/log/supervisor
RUN mkdir -p /etc/supervisor/conf.d/
ADD supervisord.conf /etc/supervisord.conf

# Expose ports.
EXPOSE 22

# Define default command.
CMD ["supervisord", "-n"]

supervisorの定義ファイルは、デフォルトの定義にsshdの起動を追加したものにしています。

$ vi supervisord.conf
[unix_http_server]
file=/tmp/supervisor.sock   ; (the path to the socket file)

[supervisord]
logfile=/tmp/supervisord.log ; (main log file;default $CWD/supervisord.log)
logfile_maxbytes=50MB        ; (max main logfile bytes b4 rotation;default 50MB)
logfile_backups=10           ; (num of main logfile rotation backups;default 10)
loglevel=info                ; (log level;default info; others: debug,warn,trace)
pidfile=/tmp/supervisord.pid ; (supervisord pidfile;default supervisord.pid)
nodaemon=false               ; (start in foreground if true;default false)
minfds=1024                  ; (min. avail startup file descriptors;default 1024)
minprocs=200                 ; (min. avail process descriptors;default 200)

[rpcinterface:supervisor]
supervisor.rpcinterface_factory = supervisor.rpcinterface:make_main_rpcinterface

[supervisorctl]
serverurl=unix:///tmp/supervisor.sock ; use a unix:// URL  for a unix socket

[include]
files = /etc/supervisor/conf.d/*.conf

[program:sshd]
command=/usr/sbin/sshd -D
autostart=true
autorestart=true

docker buildコマンドにより、イメージを作成します。
実行後、ubuntu-supervisorというイメージが作成されていることを確認します。

$ sudo docker build -t ubuntu-supervisor:12.04 .
$ sudo docker images

Sensu ServerのChefレシピ

それでは、Sensu Serverをインストーするレシピについて見ていきます。

cookbookの構成

cookbookの構成は以下の通りです。

site-cookbook
└──sensu-server
      └──recipes
      │    └──default.rb
      └──templates
            └──default
                  ├──checks_proc.json.erb ... 監視動作定義ファイル
                  ├──client.json.erb ... Sensu Clientの監視定義ファイル
                  ├──config.json.erb ... Sensu Serverの定義ファイル
                  ├──sensu.list.erb  ... リポジトリの定義ファイル
                  └──sensu-server.conf.erb ... supervisorの定義ファイル

recipesファイル

recipesファイルは以下の通りです。

$ vi site-cookbooks/sensu-server/recipes/default.rb
%w{wget python-software-properties}.each do | pkg |
    package pkg do
        action :install
    end
end

template "/etc/apt/sources.list.d/sensu.list" do
    owner "root"
    mode 0644
    source "sensu.list.erb"
end

bash "add sensu apt-key" do
    code "wget -q http://repos.sensuapp.org/apt/pubkey.gpg -O- | apt-key add -"
    action :run
end

bash "add rabbitmq apt-key" do
    code "wget -q http://www.rabbitmq.com/rabbitmq-signing-key-public.asc -O- | apt-key add -"
    action :run
end

bash "add redis repos" do
    code "add-apt-repository -y ppa:rwky/redis"
    action :run
end

bash "apt-get update" do
    code "apt-get update"
    action :run
end

%w{sensu rabbitmq-server redis-server git-core bc rsyslog}.each do | pkg |
    package pkg do
        action :install
    end
end

git "/tmp/sensu_plugins" do
    repository "git://github.com/sensu/sensu-community-plugins.git"
    reference "master"
    action :sync
end

bash "copy sensu plugins" do
    code "cp -Rf /tmp/sensu_plugins/plugins /etc/sensu/"
    action :run
end

bash "chmod sensu plugins" do
    code "find /etc/sensu/plugins/ -name *.rb -exec chmod +x {} \\;"
    action :run
end

template "sensu-server.conf" do
    path "/etc/supervisor/conf.d/sensu-server.conf"
    owner "root"
    group "root"
    mode "0644"
    source "sensu-server.conf.erb"
end

template "config.json" do
    path "/etc/sensu/config.json"
    owner "root"
    group "root"
    mode "0644"
    source "config.json.erb"
end

template "client.json" do
    path "/etc/sensu/conf.d/client.json"
    owner "root"
    group "root"
    mode "0644"
    source "client.json.erb"
end

template "checks.json" do
    path "/etc/sensu/conf.d/checks.json"
    owner "root"
    group "root"
    mode "0644"
    source "checks.json.erb"
end

bash "ln ruby path" do
    code   "ln -s /opt/sensu/embedded/bin/ruby /usr/bin/ruby"
    action :run
end

bash "supervisorctl reload" do
    code   "supervisorctl reload; sleep 10"
    action :run
end

bash "rabbitmqctl add_user" do
    code "rabbitmqctl add_user admin admin"
    action :run
end

bash "rabbitmqctl set_user_tags" do
    code "rabbitmqctl set_user_tags admin administrator"
    action :run
end

bash "rabbitmqctl set_permissions" do
    code "rabbitmqctl set_permissions -p / admin '.*' '.*' '.*'"
    action :run
end

bash "rabbitmq_management" do
    code "rabbitmq-plugins enable rabbitmq_management"
    action :run
end

bash "rabbitmq restart" do
    code   "rabbitmqctl stop"
    action :run
end
  • Sensu Serverをインストールするために、Sensuのリポジトリを指定しています。
  • 普通にapt-get install rabbitmq-serverとした場合、RabbitMQ 2.7.1がインストールされるため、RabbitMQのリポジトリを指定し、RabbitMQ 3系がインストールされるようにしています。
  • GitHubからSensuのCommunity Pluginを取得しています。
  • Sensu ServerやRabbitMQを起動するため、supervisorの定義ファイルであるsensu-server.confを配置しています。
  • RabbitMQ 3系では、RabbitMQの管理画面にguestユーザでログインするためには、localhost経由しかできない仕様となったため、adminユーザを追加しています。
  • RabbitMQの管理画面を有効にするため、rabbitmq-plugins enable rabbitmq_managementコマンドを実行後、RabbitMQを再起動が必要となります。supervisorでRabbitMQプロセスのautorestartをオンにしているため、rabbitmqctl stopコマンドだけ実行しています。

templateファイル

templateファイルは以下の通りです。

checks.json

checks.jsonは監視の動作を定義しているファイルであり、Sensu Server側に配置します。
command内のcheck-procs.rbはSensuのCommunity Pluginになります。

$ vi site-cookbooks/sensu-server/templates/default/checks_proc.json.erb
{
  "checks": {
    "sensu-rabbitmq-beam": {
      "handlers": [
        "default"
      ],
      "command": "/etc/sensu/plugins/processes/check-procs.rb -p beam -C 1 -w 4 -c 5",
      "interval": 60,
      "occurrences": 2,
      "refresh": 300,
      "subscribers": [ "sensu" ]
    },
    "sensu-rabbitmq-epmd": {
      "handlers": [
        "default"
      ],
      "command": "/etc/sensu/plugins/processes/check-procs.rb -p epmd -C 1 -w 1 -c 1",
      "interval": 60,
      "occurrences": 2,
      "refresh": 300,
      "subscribers": [ "sensu" ]
    },
    "sensu-redis": {
      "handlers": [
        "default"
      ],
      "command": "/etc/sensu/plugins/processes/check-procs.rb -p redis-server -C 1 -w 4 -c 5",
      "interval": 60,
      "occurrences": 2,
      "refresh": 300,
      "subscribers": [ "sensu" ]
    },
    "sensu-api": {
      "handlers": [
        "default"
      ],
      "command": "/etc/sensu/plugins/processes/check-procs.rb -p sensu-api -C 1 -w 4 -c 5",
      "interval": 60,
      "occurrences": 2,
      "refresh": 300,
      "subscribers": [ "sensu" ]
    },
    "sensu-dashboard": {
      "handlers": [
        "default"
      ],
      "command": "/etc/sensu/plugins/processes/check-procs.rb -p sensu-dashboard -C 1 -w 1 -c 1",
      "interval": 60,
      "occurrences": 2,
      "refresh": 300,
      "subscribers": [ "sensu" ]
    }
  }
}
client.json

client.jsonは監視対象の情報や監視定義を設定するファイルであり、Sensu Client側に配置します。
checks.jsonの"subscribers"に定義した名称をsubscriptionsに指定することで、監視定義を設定することができます。

$ vi site-cookbooks/sensu-server/templates/default/client.json.erb
{
    "client": {
      "name": "sensu-server",
      "address": "127.0.0.1",
      "subscriptions": [ "default", "sensu" ]
    }
}
config.json

config.jsonはSensu Serverの定義ファイルになります。
"rabbitmq"には、追加したユーザ名(guest以外)を指定しています。

$ vi site-cookbooks/sensu-server/templates/default/config.json.erb
{
  "rabbitmq": {
    "port": 5672,
    "host": "localhost",
    "user": "admin",
    "password": "admin",
    "vhost": "/"
  },
  "redis": {
    "host": "localhost",
    "port": 6379
  },
  "api": {
    "host": "localhost",
    "port": 4567
  },
  "dashboard": {
    "host": "localhost",
    "port": 8080,
    "user": "admin",
    "password": "admin"
  },
  "handlers": {
    "default": {
      "type": "pipe",
      "command": "true"
    }
  }
}
sensu.list

sensu.listには、SensuとRabbitMQのリポジトリを指定しています。

$ vi site-cookbooks/sensu-server/templates/default/sensu.list.erb
deb http://repos.sensuapp.org/apt sensu main
deb http://www.rabbitmq.com/debian/ testing main
sensu-server.conf

sensu-server.confには、supervisorからSensu Serverを起動する設定をしています。

$ vi site-cookbooks/sensu-server/templates/default/sensu-server.conf.erb
[program:rabbitmq]
priority=10
directory=/tmp
command=/usr/sbin/rabbitmq-server
user=root
autostart=true
autorestart=true
stopsignal=QUIT

[program:redis]
priority=10
directory=/tmp
command=redis-server
user=root
autostart=true
autorestart=true

[program:sensu-server]
priority=20
directory=/tmp
command=/opt/sensu/bin/sensu-server -c /etc/sensu/config.json -d /etc/sensu -e /etc/sensu/extensions -v -l /var/log/sensu/server.log
user=root
startsecs=5
autostart=true
autorestart=true

[program:sensu-api]
priority=30
directory=/tmp
command=/opt/sensu/bin/sensu-api -c /etc/sensu/config.json -d /etc/sensu -e /etc/sensu/extensions -v -l /var/log/sensu/api.log
user=root
startsecs=5
autostart=true
autorestart=true

[program:sensu-client]
priority=40
directory=/tmp
command=/opt/sensu/bin/sensu-client -c /etc/sensu/config.json -d /etc/sensu -e /etc/sensu/extensions -v -l /var/log/sensu/client.log
user=root
autostart=true
autorestart=true

[program:sensu-dashboard]
priority=50
directory=/tmp
command=/opt/sensu/bin/sensu-dashboard -c /etc/sensu/config.json -d /etc/sensu -e /etc/sensu/extensions -v -l /var/log/sensu/dashboard.log
user=root
autostart=true
autorestart=true

Chefレシピの実行

Dockerコンテナを起動します。
22、8080、4567、5672、15672のポートを外部からアクセスできるようにしておきます。

$ sudo docker run -d -p 22 -p 8080:8080 -p 4567:4567 -p 5672:5672 -p 15672:15672 ubuntu-supervisor:12.04
$ sudo docker ps -a
CONTAINER ID        IMAGE                                 COMMAND                CREATED             STATUS                    PORTS                                                                                                                        NAMES
b245647afb46        ubuntu-supervisor:12.04               supervisord -n         27 minutes ago      Up 27 minutes             0.0.0.0:4567->4567/tcp, 0.0.0.0:5672->5672/tcp, 0.0.0.0:15672->15672/tcp, 0.0.0.0:[ポート番号]->22/tcp, 0.0.0.0:8080->8080/tcp     drunk_mayer

Sensu ServerのChefレシピを流します。
Chefを実行する時は、22番ポートにフォワードされているポート番号を指定します。

$ vi nodes/<IPアドレス>.json
{
  "run_list": [
    "recipe[sensu-server]"
  ]
}
$ knife solo bootstrap root@<IPアドレス> -p [ポート番号]

Sensu Serverの管理画面

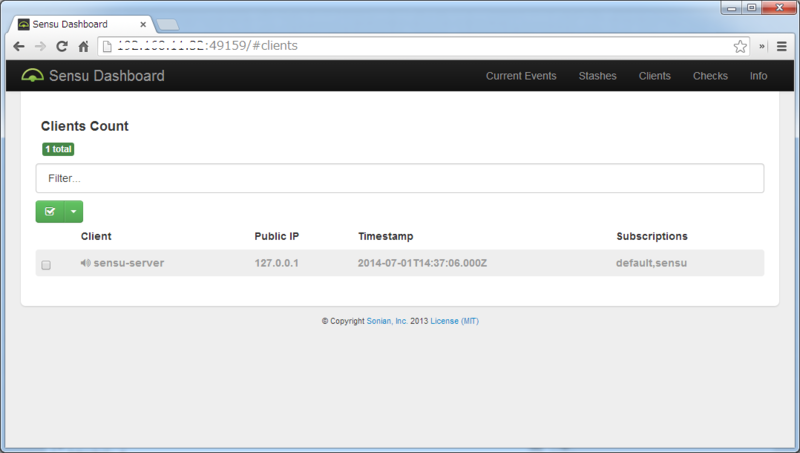
Sensu Serverの構築ができたことを確認するため、「http://<サーバのIPアドレス>:8080」にアクセスし、Sensuのダッシュボードに接続します。ログインはadmin/adminでできます。(config.jsonで定義しています。)
f:id:hidemium:20140701233758p:plain

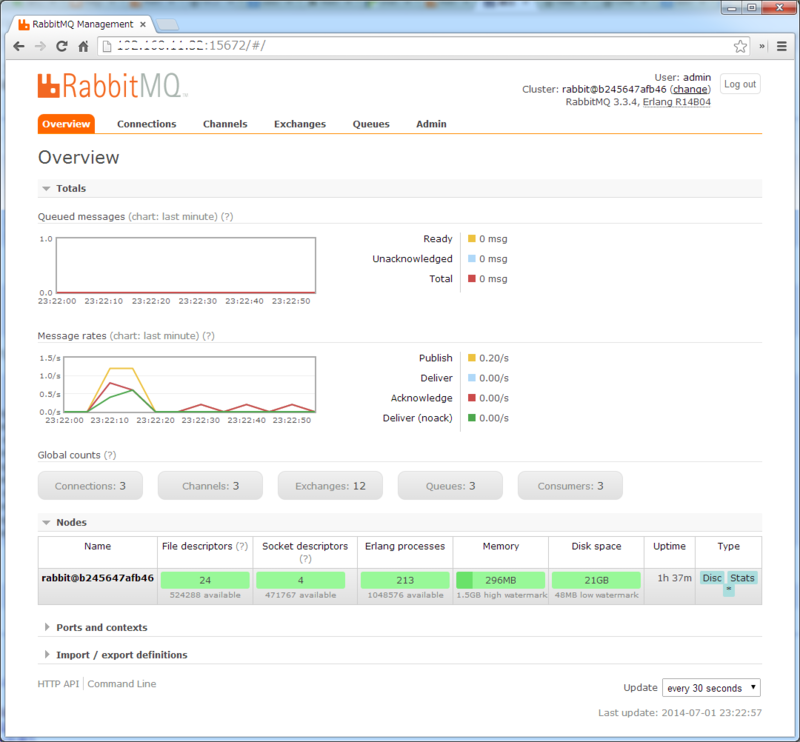
また、「http://<サーバのIPアドレス>:15672」にアクセスし、RabbitMQの管理画面に接続します。ログインはadmin/adminでできます。(config.jsonで定義しています。)
f:id:hidemium:20140702001932p:plain

おわりに

ChefからDockerコンテナにSensu Serverをインストールすることができました。*1
Sensuの環境ができたので、これから色々試してみたいと思います。

Sensuの特徴として、クライアント(監視対象)の自動登録がありますが、Dockerのようにscrap & buildが多い仮想環境に合っているのではと思っています。
Dockerコンテナをプロビジョニングする際に、Sensu Clientをインストールする仕組みにしておけば、コンテナをいくら起動しても監視設定を自動的にすることができるかもしれません。

*1:Chefを使ったDockerコンテナのプロビジョニングは、慣れてくると意外といい気がしてきました。

VMwareでUbuntuのディスク容量を拡張する

VMware上のUbuntuサーバでDockerのイメージを色々作っていたら、ディスク容量がいつのまにか少なくなっていたので、ディスク容量の拡張を行いました。

構成

Ubuntu 12.04
※上記のサーバはVMware ESXi 5.1上で動作しています。

VMware

サーバを停止

サーバのハードウェアを追加するため、サーバをシャットダウンしておきます。

$ sudo shutdown -h now

仮想ディスクを拡張する

  1. 対象の仮想サーバを右クリックし、「設定の編集」をクリックします。
  2. ハードウェアタブ>追加ボタンをクリックします。
  3. ハードウェアの追加>ハードディスクを選択し、次へをクリックします。
  4. 新規仮想ディスクを作成を選択し、次へをクリックします。
  5. 追加するディスク容量とディスクプロビジョニングを入力し、次へをクリックします。
  6. 詳細オプションはなにも変更せず、次へをクリックします。
  7. 設定内容を確認し、終了をクリックする。
  8. 対象の仮想サーバを右クリックし、電源>パワーオンをクリックします。

※仮想ディスクの容量拡張がなぜかできなかったため、新たな仮想ディスクを追加しています。

ディスク容量の拡張

Ubuntuサーバのパーティション構成は、OSインストール時のデフォルト設定であるため、LVM(Logical Volume Manager)を使用しています。追加した仮想ディスクを既存のボリュームグループに追加することで、ディスク容量の拡張を行います。

物理ボリュームの作成

追加した仮想ディスクのパーティションを作成します。

$ sudo parted /dev/sdb
GNU Parted 2.3
/dev/sdb を使用
GNU Parted へようこそ! コマンド一覧を見るには 'help' と入力してください。
# パーティションテーブルを設定(printが実行できないので)
(parted) mklabel msdos
(parted) print
モデル: VMware Virtual disk (scsi)
ディスク /dev/sdb: 21.5GB
セクタサイズ (論理/物理): 512B/512B
パーティションテーブル: msdos

# 追加したディスクの全容量を新たなパーティションに
(parted) unit GB
(parted) mkpart extended 0 -1
(parted) mkpart logical 0 -1
(parted) print
モデル: VMware Virtual disk (scsi)
ディスク /dev/sdb: 21.5GB
セクタサイズ (論理/物理): 512B/512B
パーティションテーブル: msdos

番号  開始    終了    サイズ  タイプ    ファイルシステム  フラグ
 1    0.00GB  21.5GB  21.5GB  extended                    lba
 5    0.00GB  21.5GB  21.5GB  logical

# パーティションフラグをlvmに変更
(parted) set 5 lvm on
(parted) print
モデル: VMware Virtual disk (scsi)
ディスク /dev/sdb: 21.5GB
セクタサイズ (論理/物理): 512B/512B
パーティションテーブル: msdos

番号  開始    終了    サイズ  タイプ    ファイルシステム  フラグ
 1    0.00GB  21.5GB  21.5GB  extended                    lba
 5    0.00GB  21.5GB  21.5GB  logical                     lvm
(parted) quit

サーバをリブートします。

$ sudo shutdown -r now

物理ボリュームを作成します。

$ sudo ls -la /dev/sdb5
brw-rw---- 1 root disk 8, 21  6月 22 12:58 /dev/sdb5
$ sudo pvcreate /dev/sdb5
  Physical volume "/dev/sdb5" successfully created

ボリュームグループの拡張

現在のボリュームグループのサイズを確認します。

$ sudo vgdisplay -v <ボリュームグループ名>
  --- Volume group ---
  VG Size               19.76 GiB

ボリュームグループを拡張します。

$ sudo vgextend <ボリュームグループ名> /dev/sdb5

ボリュームグループが拡張されたことを確認します。

$ sudo vgdisplay -v <ボリュームグループ名>
  --- Volume group ---
  VG Size               39.75 GiB

論理ボリュームの拡張

現在の論理ボリュームのサイズを確認します。

$ sudo lvdisplay <論理ボリューム名>
  --- Logical volume ---
  LV Size                15.74 GiB

論理ボリュームを拡張します。
論理ボリュームのサイズは、エクステント数による指定を行い、無駄がないように調整します。

$ sudo lvresize -L 36616 <論理ボリューム名>
  Extending logical volume root to 35.76 GiB
  Logical volume root successfully resized

論理ボリュームが拡張されたことを確認します。

$ sudo lvdisplay <論理ボリューム名>
  --- Logical volume ---
  LV Size                35.76 GiB

ファイルシステムの拡張

現在のファイルシステムのサイズを確認します。

$ df -h
Filesystem                        Size  Used Avail Use% Mounted on
<論理ボリューム名>                 15G   14G    1G  90% /

ファイルシステムを拡張します。

$ sudo resize2fs <論理ボリューム名>
resize2fs 1.42 (29-Nov-2011)
Filesystem at <論理ボリューム名> is mounted on /; on-line resizing required
old desc_blocks = 1, new_desc_blocks = 2
Performing an on-line resize of <論理ボリューム名> to 5046272 (4k) blocks.
The filesystem on <論理ボリューム名> is now 5046272 blocks long.

ファイルシステムが拡張されたことを確認します。

$ df -h
Filesystem                        Size  Used Avail Use% Mounted on
<論理ボリューム名>                 36G   14G   21G  40% /

これでディスク容量を拡張することができました。

ChefからDockerコンテナ内の起動プロセスを追加する

Dockerはコンテナの起動時に、initプロセスではなく、CMDで指定したプロセスから実行されるため、通常は1つしかプロセスを起動できない制約があります。しかし、プロセス管理ツールのsupervisorを使用すれば、コンテナ内で複数のプロセスを起動することができます。

前回、Dockerfileを使ってsupervisorからsshdとMySQLのプロセスを起動させることを確認できました。そこで、Chefを使ってsupervisorに起動プロセスの定義を追加することで、コンテナ内の起動プロセスを追加できないか試してみました。

構成

Ubuntu 12.04: サーバ構築対象
Ubuntu 12.04はDocker 0.10上で動作しています。

Dockerfileの作成

Dockerfileの構成は以下の通りです。

sshd
├──Dockerfile
├──sources.list      ... ミラーサイト一覧
├──id_rsa.pub        ... Chef workstationの公開鍵
└──supervisord.conf  ... supervisorの定義ファイル

Dockerfileを以下のように作成します。
後でMySQLを起動できるように、「RUN dpkg-divert~」を設定しています。
supervisorの定義ファイルは、/etc/supervisor/conf.d/配下にも置くことができるので、「RUN mkdir -p /etc/supervisor/conf.d/」でディレクトリを作成しています。

$ vi Dockerfile
FROM ubuntu:12.04

MAINTAINER hidemium

# Ubuntu update
ADD sources.list /etc/apt/sources.list
RUN apt-get -y update

# Hack for initctl not being available in Ubuntu
RUN dpkg-divert --local --rename --add /sbin/initctl
RUN ln -sf /bin/true /sbin/initctl

# ssh install
RUN apt-get -y install openssh-server
RUN apt-get -y install python-setuptools
RUN apt-get clean
RUN easy_install supervisor

RUN mkdir /var/run/sshd
RUN echo 'root:root' | chpasswd

# sshd config
ADD id_rsa.pub /root/id_rsa.pub
RUN mkdir /root/.ssh/
RUN mv /root/id_rsa.pub /root/.ssh/authorized_keys
RUN chmod 700 /root/.ssh
RUN chmod 600 /root/.ssh/authorized_keys
RUN sed -i -e '/^UsePAM\s\+yes/d' /etc/ssh/sshd_config

# supervisor config
RUN mkdir -p /var/log/supervisor
RUN mkdir -p /etc/supervisor/conf.d/
ADD supervisord.conf /etc/supervisord.conf

# Expose ports.
EXPOSE 22

# Define default command.
CMD ["supervisord", "-n"]

supervisorの定義ファイルは、デフォルトの定義にsshdの起動を追加したものにしています。

$ vi supervisord.conf
[unix_http_server]
file=/tmp/supervisor.sock   ; (the path to the socket file)

[supervisord]
logfile=/tmp/supervisord.log ; (main log file;default $CWD/supervisord.log)
logfile_maxbytes=50MB        ; (max main logfile bytes b4 rotation;default 50MB)
logfile_backups=10           ; (num of main logfile rotation backups;default 10)
loglevel=info                ; (log level;default info; others: debug,warn,trace)
pidfile=/tmp/supervisord.pid ; (supervisord pidfile;default supervisord.pid)
nodaemon=false               ; (start in foreground if true;default false)
minfds=1024                  ; (min. avail startup file descriptors;default 1024)
minprocs=200                 ; (min. avail process descriptors;default 200)

[rpcinterface:supervisor]
supervisor.rpcinterface_factory = supervisor.rpcinterface:make_main_rpcinterface

[supervisorctl]
serverurl=unix:///tmp/supervisor.sock ; use a unix:// URL  for a unix socket

[include]
files = /etc/supervisor/conf.d/*.conf

[program:sshd]
command=/usr/sbin/sshd -D
autostart=true
autorestart=true

Chefレシピの作成例

それでは、Chef側について見ていきます。
今回、apache2とMySQLについて試してみました。

apache2

cookbookの構成は以下の通りです。

site-cookbook
└──apache2
      └──recipes
      │    └──default.rb
      └──templates
            └──default
                  └──apache2.conf.erb ... supervisorの定義ファイル

recipesファイル(抜粋)は以下の通りです。

Chef側では、templateファイルとしてsupervisorの定義ファイルを用意します。
定義ファイルを配置後、supervisorctl reloadコマンドによりプロセスを起動します。
プログラムによっては、supervisorctl <サービス名> startコマンドでも起動できない場合があるため、supervisorctl reloadコマンドでsupervisorに定義されたプロセスをすべて再読み込みさせています。
ChefはSSH接続で実行していますが、supervisorの再読み込みでSSHが切断されることはありませんでした。

$ vi site-cookbooks/apache2/recipes/default.rb
:
package "apache2" do
    action :install
end

template "apache2.conf" do
    path "/etc/supervisor/conf.d/apache2.conf"
    owner "root"
    group "root"
    mode "0644"
    source "apache2.conf.erb"
end

bash "supervisorctl reload" do
    code   "supervisorctl reload"
    action :run
end
:

templateファイルは以下の通りです。

$ vi site-cookbooks/apache2/templates/default/apache2.conf.erb
[program:apache2]
command=/bin/bash -c "source /etc/apache2/envvars && exec /usr/sbin/apache2 -DFOREGROUND"

MySQL

cookbookの構成は以下の通りです。

site-cookbook
└──mysql
      └──recipes
      │    └──default.rb
      └──templates
            └──default
                  └──mysqld.conf.erb ... supervisorの定義ファイル

MySQLを追加する場合のrecipesファイル(抜粋)は以下の通りです。

上記と同じ構成となっています。
supervisorctl reloadコマンド後に、sleepを入れいるのは、mysqldの起動に時間がかかるため、mysqlコマンドを実行しても接続できないためです。

$ vi site-cookbooks/mysql/recipes/default.rb
:
package "mysql-server" do
    action :install
end

template "mysqld.conf" do
    path "/etc/supervisor/conf.d/mysqld.conf"
    owner "root"
    group "root"
    mode "0644"
    source "mysqld.conf.erb"
end

bash "supervisorctl reload" do
    code   "supervisorctl reload; sleep 3"
    action :run
end
:

templateファイルは以下の通りです。

$ vi site-cookbooks/mysql/templates/default/mysqld.conf.erb
[program:mysqld]
command=/usr/bin/mysqld_safe

おわりに

supervisorを使って複数のプロセスを起動させる場合、プロセスごとにDockerfileを用意する必要があり、効率が良くないなと考えていました。今回、Chefからコンテナの起動プロセスを追加することができたため、SSH接続ができるところまでをDockerfile、それ以降をChefといったプロビジョニングツールでといった役割分担ができそうです。

WindowsでSphinxからPDFファイルを作成する

WindowsSphinxからPDFファイルを作成しようとしたときに、なぜかWeb上に情報が少なく、はまってしまったのでメモしときます。

Sphinxのインストール

Pythonのインストール

SphinxPythonの2系と3系に対応しているようですが、2.7系が一番使われているようなので、2.7系をインストールします。
まず、Python.orgから「python-2.7.3.msi」をダウンロードします。ダウンロードができたら、「python-2.7.3.msi」をクリックして、pythonをインストールします。*1

インストール後に、システムの環境変数のPathに以下を追加します。

C:¥Python27
C:¥Python27¥Scripts

easy_installコマンドのインストール

https://bitbucket.org/pypa/setuptools/raw/bootstrap/ez_setup.pyのリンクを右クリックからダウンロードして、「ez_setup.py」として保存します。
以下のコマンドを実行して、easy_installコマンドをインストールします。

> python ez_setup.py

Sphinxのインストール

以下のコマンドを実行して、Sphinxをインストールします。

> easy_install sphinx

PDFファイルの作成

TeXLiveのインストール

SphinxからPDFファイルを作成する場合、rst2pdfとLatex経由の2種類ありますが、Latex経由のほうが見た目がきれいなPDFファイルが作れるようなので、こちらの方法をとります。

Installing TeX Live over the Internetから「install-tl.zip」をダウンロードします。
「install-tl.zip」を展開し、「install-tl.bat」をクリックします。「install-tl.bat」をクリックすると、インストーラが起動します。
「既定リポジトリを変更」にチェックを入れ、「次へ」をクリックします。「ミラー」から日本のミラーサイトを選択します。後はインストーラに従って、インストールを行います。ファイルのダウンロードに時間がかかるので、時間に余裕のあるときにしたほうがいいかもしれません。

Sphinxプロジェクトの作成

Sphinxの初期設定として、プロジェクトを作ります。
プロジェクトを保存する任意のフォルダを作成し、以下のコマンドを実行します。

> mkdir <フォルダ名>
> cd <フォルダ名>
> sphinx-quickstart

基本的に設定が必要な箇所は以下の通りです。

Root path for the documentation [.]: フォルダに移動しているのでそのままリターン
Project name: <プロジェクト名>
Author name(s): <著者名>
Project version: <バージョン名>

Sphinxプロジェクトの設定変更

上記で作成したプロジェクトのフォルダ配下に「conf.py」というファイルがあるので、以下の内容をファイルに追加します。

# 言語の設定
language = 'ja'

# LaTeX の docclass 設定
latex_docclass = {'manual': 'jsbook'}

make.batの作成

この状態でmake latexpdfjpコマンドを実行しても、以下のようなメッセージが出力され、PDFファイルが作成されませんでした。

> make latexpdfja
Making output directory...
Running Sphinx v1.2.2
loading pickled environment... done
building [latex]: all documents
updating environment: 0 added, 0 changed, 0 removed
looking for now-outdated files... none found
processing BookReview.tex... index
resolving references...
writing... done
copying TeX support files...
done
build succeeded.
'make' は、内部コマンドまたは外部コマンド、
操作可能なプログラムまたはバッチ ファイルとして認識されていません。

Build finished; the PDF files are in _build/latex.

make.batの中を確認すると、make latexpdfjpコマンドが実行されると、_build\latexに移動し、make all-pdf-jaコマンドを実行していました。しかし、_build\latex配下にmake.batが存在しないため、実行に失敗していたようです。

Sphinx-Usersのメーリングリストを確認したところ、プロジェクト配下のmake.batファイルとは異なる「make.bat」を作成し、sphinx\texinputs配下に配置することで解決できそうです。

そこで、以下のmake.batを作成し、「C:\Python27\Lib\site-packages\sphinx-1.2.2-py2.7.egg\sphinx\texinputs」(デフォルトパス)に配置します。

> more make.bat
@@echo off
setlocal

::set %LATEXOPTS%=

if "%1" EQU "all-pdf" goto all-pdf
if "%1" EQU "all-dvi" goto all-dvi
if "%1" EQU "all-ps" goto all-ps
if "%1" EQU "all-pdf-ja" goto all-pdf-ja
if "%1" EQU "clean" goto clean

:all-pdf
for %%f in (*.tex) do pdflatex %LATEXOPTS% %%f
for %%f in (*.idx) do if exist %%f (makeindex -s python.ist %%f)
for %%f in (*.tex) do pdflatex %LATEXOPTS% %%f
goto end

:all-dvi
for %%f in (*.tex) do latex %LATEXOPTS% %%f
for %%f in (*.idx) do if exist %%f (makeindex -s python.ist %%f)
for %%f in (*.tex) do latex %LATEXOPTS% %%f
goto end

:all-ps
for %%f in (*.tex) do latex %LATEXOPTS% %%f
for %%f in (*.idx) do if exist %%f (makeindex -s python.ist %%f)
for %%f in (*.tex) do latex %LATEXOPTS% %%f
for %%f in (*.dvi) do dvips %%f
goto end

:all-pdf-ja
for %%f in (*.pdf *.png *.gif *.jpg *.jpeg) do extractbb %%f
for %%f in (*.tex) do platex -kanji=utf8 %LATEXOPTS% %%f
for %%f in (*.idx) do if exist %%f (mendex -U -f -d "`basename %%f .idx`.dic" -s python.ist %%f)
for %%f in (*.tex) do platex -kanji=utf8 %LATEXOPTS% %%f
for %%f in (*.dvi) do dvipdfmx %%f
goto end

:clean
del *.dvi *.log *.ind *.aux *.toc *.syn *.idx *.out *.ilg *.pla
goto end

:end

PDFファイルの作成

以下のコマンドを実行し、SphinxのドキュメントからLaTeX経由でPDFファイルを作成します。_build\latex配下にPDFファイルが作成されていることを確認します。

> make latexpdfja

*1:最新の2.7.6だとhtmlの生成に失敗する場合があったので、2.7.3にしています。

DockerでMySQLを起動するDockerfileを書いてみた

Dockerfileを書く練習のため、今回は、sshdとMySQLの複数プロセスを起動するDockerfileを書いてみました。Dockerはプロセスを起動させるコマンドを1つしか指定できないため、プロセス管理ツールのSupervisorを使用しています。また、コンテナ内のデータベースファイルをホスト側に保存されるようにしてみました。

構成

Ubuntu 12.04: サーバ構築対象
Ubuntu 12.04はDocker 0.10上で動作しています。

Dockerfileの作成

Dockerfileを以下のように作成します。

$ mkdir -p docker/mysql
$ cd docker/mysql
$ vi Dockerfile
FROM ubuntu:12.04

MAINTAINER hidemium

# Ubuntu update
ADD sources.list /etc/apt/sources.list
RUN apt-get -y update

# Hack for initctl not being available in Ubuntu
RUN dpkg-divert --local --rename --add /sbin/initctl
RUN ln -sf /bin/true /sbin/initctl

# ssh install
RUN apt-get -y install openssh-server
RUN apt-get -y install python-setuptools
RUN easy_install supervisor
RUN mkdir -p /var/log/supervisor

# MySQL install
RUN apt-get install -y mysql-server
RUN apt-get clean

RUN mkdir /var/run/sshd
RUN echo 'root:root' | chpasswd

# sshd config
ADD id_rsa.pub /root/id_rsa.pub
RUN mkdir /root/.ssh/
RUN mv /root/id_rsa.pub /root/.ssh/authorized_keys
RUN chmod 700 /root/.ssh
RUN chmod 600 /root/.ssh/authorized_keys
RUN sed -i -e '/^UsePAM\s\+yes/d' /etc/ssh/sshd_config

# supervisor config
RUN mkdir -p /var/log/supervisor
ADD supervisord.conf /etc/supervisord.conf

# MySQL config
ADD mysql-listen.cnf /etc/mysql/conf.d/mysql-listen.cnf
RUN (/usr/bin/mysqld_safe &); sleep 3; mysqladmin -u root password 'passw0rd'; (echo 'grant all privileges on *.* to root@"%" identified by "passw0rd" with grant option;' | mysql -u root -ppassw0rd)

# Define mountable directories.
VOLUME ["/var/lib/mysql"]

# Expose ports.
EXPOSE 22 3306

# Define default command.
CMD ["supervisord", "-n"]
  • 「RUN dpkg-divert --local --rename --add /sbin/initctl」と「RUN ln -sf /bin/true /sbin/initctl」は、DockerでMySQLを使うためのハックのようです。詳しくはまだ理解できていません。。
  • 「RUN easy_install supervisor」は、apt-getでsupervisorのインストールができなかったため、easy_installにてインストールを行っています。
  • 「ADD supervisord.conf /etc/supervisord.conf」は、supervisorから起動するプロセスの定義ファイルを追加しています。
  • 「ADD mysql-listen.cnf /etc/mysql/conf.d/mysql-listen.cnf」はホスト側からMySQLへ接続できるように許可します。
  • 「RUN (/usr/bin/mysqld_safe &)~」はMySQLを一度起動して、パスワードの設定とホスト側からMySQLへ接続できるように許可します。
  • 「VOLUME ["/var/lib/mysql"]」はホスト側でマウントするディレクトリを指定します。

Dockerfileの中で、読み込みを行っているファイルは以下の通りです。

$ vi sources.list
deb http://jp.archive.ubuntu.com/ubuntu precise main restricted
deb-src http://jp.archive.ubuntu.com/ubuntu precise main restricted
deb http://jp.archive.ubuntu.com/ubuntu precise-updates main restricted
deb-src http://jp.archive.ubuntu.com/ubuntu precise-updates main restricted
$ vi mysql-listen.cnf
[mysqld]
bind = 0.0.0.0
$ vi supervisord.conf
[supervisord]
nodaemon=true

[program:sshd]
command=/usr/sbin/sshd -D
autostart=true
autorestart=true

[program:mysqld]
command=/usr/bin/mysqld_safe
autostart=true
autorestart=true

Dockerの場合、MySQLの起動にservice mysql startが使えないため、/usr/bin/mysqld_safeで起動します。

MySQLコンテナの起動

以下のコマンドで、Dockerfileからビルドし、Dockerコンテナの起動を行います。
Dockerコンテナの起動時には、-vオプションを指定し、コンテナ内のデータベースファイルをホストのディレクトリに保存するようにしています。

$ sudo docker build -t ubuntu-mysql .
$ sudo docker run -d -p 22 -p 3306 -v /opt/mysql/data:/var/lib/mysql --name ubuntu-mysql ubuntu-mysql

mysqld_safeで起動しているため、ビルドするときに以下のエラーが出ることがあります。

140522 18:26:08 mysqld_safe Can't log to error log and syslog at the same time.  Remove all --log-error configuration options for --syslog to take effect.
140522 18:26:08 mysqld_safe Logging to '/var/log/mysql/error.log'.
140522 18:26:08 mysqld_safe Starting mysqld daemon with databases from /var/lib/mysql

Dockerコンテナの3306番ポートにフォワードしているポート番号を確認し、ホスト側からMySQLに接続できることを確認します。
Dockerfileで外部から接続する許可を行っているため、コンテナの起動直後からMySQLにログインできます。

$ sudo docker port ubuntu-mysql 3306
0.0.0.0:<ポート番号>
$ mysql -uroot -h 127.0.0.1 -P <ポート番号> -ppassw0rd

rbenvでruby をインストールするChefのレシピを書いてみた

前回は、Opscode Communityに公開さているレシピを使い、rubyをインストールしましたが、Chefのレシピを書く練習のため、今回は、rbenvでrubyをインストールするレシピを書いてみました。

構成

Windows 7: Chef 11.10
Ubuntu 12.04: サーバ構築対象
Ubuntu 12.04はDocker 0.10上で動作しています。

レシピの作成

Rubyインストール用のcookbookを作成します。

$ cd chef-repo/
$ knife cookbook create ruby -o site-cookbooks

recipesファイルを以下のように編集します。
設定内容は以前の記事とほぼ同じですが、「.bash_profile」を「rbenv.sh」に変更したり、Ubuntuに合わせて導入パッケージを変更したりしています。また、実行ユーザはrootユーザを想定しています。

$ vi site-cookbooks/ruby/recipes/default.rb
%w{git-core build-essential libssl-dev}.each do | pkg |
    package pkg do
        action :install
    end
end

git "/usr/local/rbenv" do
    repository "git://github.com/sstephenson/rbenv.git"
    reference "master"
    action :sync
end

%w{/usr/local/rbenv/shims /usr/local/rbenv/versions}.each do |dir|
    directory dir do
    action :create
    end
end

git "/usr/local/ruby-build" do
    repository "git://github.com/sstephenson/ruby-build.git"
    reference "master"
    action :sync
end

bash "install_ruby_build" do
    cwd  "/usr/local/ruby-build"
    code "./install.sh"
    action :run
end

template "rbenv.sh" do
    path "/etc/profile.d/rbenv.sh"
    owner "root"
    group "root"
    mode "0644"
    source "rbenv.sh.erb"
end

bash "rbenv install" do
    code   "source /etc/profile.d/rbenv.sh; rbenv install #{node.build}"
    action :run
    not_if { ::File.exists?("/usr/local/rbenv/versions/#{node.build}") }
end

bash "rbenv rehash" do
    code   "source /etc/profile.d/rbenv.sh; rbenv rehash"
    action :run
end

bash "rbenv global" do
    code   "source /etc/profile.d/rbenv.sh; rbenv global #{node.build}"
    action :run
end

attributesファイルを以下のように編集します。
インストールするRubyのバージョンを変更する場合は、attributesファイルで変更します。※2.0.0-p353も対応しています。

$ vi site-cookbooks/ruby/attributes/default.rb
default["build"] = "1.9.3-p545"

templatesファイルを以下のように編集します。

$ vi site-cookbooks/ruby/templates/default/rbenv.sh.erb
export RBENV_ROOT="/usr/local/rbenv"
export PATH="/usr/local/rbenv/bin:$PATH"
eval "$(rbenv init -)"

JSONファイルにRubyインストール用のcookbookを指定します。

$ vi nodes/<サーバのIPアドレス>.json
{
  "run_list":[
    "recipe[ruby]"
  ]
}

サーバにChefをインストールします。

$ knife solo bootstrap root@<サーバのIPアドレス> -p <ポート番号>

他のOSバージョンでの実行

今回、Ubuntu 12.04に対するレシピを作成しましたが、それ以外のOSバージョンで上記のレシピを実行した場合にどうなるか試してみました。
レシピを実行した結果、以下のようなエラーがでました。

---- Begin output of apt-get -q -y install git-core=1:1.7.9.5-1 ----
STDOUT: Reading package lists...
Building dependency tree...
Reading state information...
Some packages could not be installed. This may mean that you have
requested an impossible situation or if you are using the unstable
distribution that some required packages have not yet been created
or been moved out of Incoming.
The following information may help to resolve the situation:

The following packages have unmet dependencies:
 git-core : Depends: git (> 1:1.7.0.2) but it is not going to be installed
STDERR: E: Unable to correct problems, you have held broken packages.
---- End output of apt-get -q -y install git-core=1:1.7.9.5-1 ----
Ran apt-get -q -y install git-core=1:1.7.9.5-1 returned 100
WARNING: Chef-Client has not been regression tested on this O/S Distribution
WARNING: Do not use this configuration for Production Applications.  Use at your own risk.
:
---- Begin output of apt-get -q -y install build-essential=11.5ubuntu2.1 ----
STDOUT: Reading package lists...
Building dependency tree...
Reading state information...
Some packages could not be installed. This may mean that you have
requested an impossible situation or if you are using the unstable
distribution that some required packages have not yet been created
or been moved out of Incoming.
The following information may help to resolve the situation:

The following packages have unmet dependencies:
 build-essential : Depends: libc6-dev but it is not going to be installed or
                            libc-dev
                   Depends: g++ (>= 4:4.4.3) but it is not going to be installed

STDERR: E: Unable to correct problems, you have held broken packages.
---- End output of apt-get -q -y install build-essential=11.5ubuntu2.1 ----
Ran apt-get -q -y install build-essential=11.5ubuntu2.1 returned 100

予想以上にOSのバージョン差異による影響がありました。また、対象OSでChef-Clientがテストされていない場合もあるようです。Chefを導入する場合は、テストが重要になってきそうです。
ちなみに、他のOSバージョンでのテストも、Dockerを用いて行いました。テストごとに環境を使い捨てにできるで、さくっと使えて便利ですね。

WindowsへのChef Soloのインストールと環境改善

WindowsにChefをインストールできるようなので試してみました。また、Chefの実行はコマンドプロンプトから行うため、合わせてコマンドプロンプトを使いやすくしてみた。

構成

Windows 7: Chef 11.10
Ubuntu 12.04: サーバ構築対象
Ubuntu 12.04はDocker 0.10上で動作しています。

インストール

Ruby

まず、WindowsRubyのインストールを行います。
Windows用のインストーラーが用意されているため、RubyInstallerから「rubyinstaller-1.9.3-p545.exe」をダウンロードします。*1

「rubyinstaller-1.9.3-p545.exe」をクリックし、Rubyをインストールします。
ほぼデフォルトのままで良いかと思いますが、「インストール先とオプションの指定」では、以下のように指定しました。

  • インストールフォルダ: C:\Ruby\1.9.3-p545
  • Rubyの実行ファイルへ環境変数PATHを設定する チェック

インストール後に、コマンドプロンプトにて以下のコマンドを実行し、Rubyがインストールされていることを確認します。

> ruby -v
ruby 1.9.3p545 (2014-02-24) [i386-mingw32]

DevKit

ChefのインストールにDevKitも必要であるため、同じサイトから「DevKit-tdm-32-4.5.2-20111229-1559-sfx.exe」をダウンロードします。

適当なフォルダに展開し、以下のコマンドを実行し、インストールを行います。

> cd C:\Ruby\DevKit
> ruby dk.rb init
> ruby dk.rb install

cwRsync

ChefはSSHを使用しているため、WindowsでもSSHを使用できるようにするため、cwRsyncというソフトウェアを使用します。
cwRsync - Rsync for Windowsから「Free」をクリックします。次にダウンロードページから「Download!」をクリックし、「cwRsync_5.3.0_Free.zip」をダウンロードします。

適当なフォルダに展開します。

> mkdir C:\User\<アカウント名>\bin
> C:\Users\<アカウント名>\bin\cwRsync_5.3.0に展開

次に、システム環境変数のPathに以下を追加します。

;C:\Users\<アカウント名>\bin\cwRsync_5.3.0

以下のコマンドを実行し、他サーバへSSH接続が可能か確認します。

> ssh <ユーザ名>@<サーバのIPアドレス>:

サーバにパスワードなしで接続できるように、公開鍵認証の設定を行います。
ssh-keygenコマンドで認証用の鍵を作成し、対象サーバへ転送します。

> ssh-keygen
> cd C:\User\<アカウント名>\.ssh
> rsync id_rsa.pub <ユーザ名>@<サーバのIPアドレス>:
> ssh <ユーザ名>@<サーバのIPアドレス> # サーバへログイン
$ cat id_rsa.pub >> ~/.ssh/authorized_keys

Chef

以下のコマンドを実行し、Chefのインストールを行います。
このあたりはCentOSと変わりません。

> cd C:\User\<アカウント名>
> gem install chef -v 11.10 # Chefをインストール
> knife configure # 初期設定
> gem install knife-solo

今回、Ruby1.9系を使用しましたが、Ruby2.0系でknife configureコマンドを実行した際に、以下のメッセージが出力される場合があり、おとなしくRuby1.9系にしました。

> knife configure
ERROR: Ohai::Exceptions::DependencyNotFound: Can not find a plugin for dependency os
> knife configure
DL is deprecated, please use Fiddle
C:/Ruby/2.0.0-p481/lib/ruby/gems/gems/windows-api-0.4.0/lib/windows/api.rb:1:in `req
uire': 126: 指定されたモジュールが見つかりません。 - C:/Ruby/2.0.0-p481/lib/ruby/g
ems/gems/win32-api-1.4.6-x86-mswin32-60/lib/win32/api.so (LoadError)

また、Chef11.12系では、knife cookをした際に以下のような警告メッセージが出力されるようになりました。Windowsでの対処方法が見つからなかったため、Chef11.10系を指定してインストールしています。

SSL validation of HTTPS requests is disabled. HTTPS connections are still                       
encrypted, but chef is not able to detect forged replies or man in the middle                   
attacks.                                                                                        
                                                                                                
To fix this issue add an entry like this to your configuration file:                            
                                                                                                
```                                                                                             
  # Verify all HTTPS connections (recommended)                                                  
  ssl_verify_mode :verify_peer                                                                  
                                                                                                
  # OR, Verify only connections to chef-server                                                  
  verify_api_cert true                                                                          
```                                                                                             
                                                                                                
To check your SSL configuration, or troubleshoot errors, you can use the                        
`knife ssl check` command like so:                                                              
                                                                                                
```                                                                                             
  knife ssl check -c /tmp/vagrant-chef-1/solo.rb                                                
```                                                   

次に、Chefのリポジトリを作成します。

> knife solo init chef-repo

cookbookを作成します。

> cd chef-repo
> knife cookbook create apache2 -o site-cookbooks
> site-cookbooks/apache2/recipes/default.rb
package "apache2" do
    action :install
end

サーバのIPアドレス.jsonのファイルが作成されるため、実行したいcookbookを指定します。

> nodes/<サーバのIPアドレス>.json
{
  "run_list":[
    "recipe[apache2]"
  ]
}

サーバへChefをインストールし、cookbookを実行します。

> knife solo bootstrap <ユーザ名>@<サーバのIPアドレス> -p <Dockerコンテナのポート番号>

コマンドプロンプトを使いやすくする

Console

コマンドプロンプトを拡張する「Console」というソフトウェアがあります。このソフトウェアは、コマンドラインの実行環境はそのままで、フォントの変更やコピーアンドペーストの挙動、背景の透明化、タブ化など、コマンドプロンプトではできない機能を使用することができます。

Consoleから、「Console-2.00b148-Beta_32bit.zip」をダウンロードし、適当なフォルダに展開します。

> mkdir C:\User\<アカウント名>\tools
> C:\Users\<アカウント名>\tools\Consoleに展開

Console.exeから起動することができます。
[Edit]>[Setting..]をクリックすると、Console Settingの画面が開きます。
代表的な設定は以下で設定することができます。

  • フォント: Appearance>Font>Name
  • コピーアンドペーストの挙動: Behavior>Copy Paste
  • 背景の透明化: Appearance>More..>Window transparency>Alpha>Active window,Inactive windows
  • 上矢印キーで履歴: Hotkeys>Use Scroll Lock for scrollingをOFF

Vim

コマンドプロンプトにはCUIエディタがないため、Windows用のVimをインストールします。
Vim — KaoriYaから「vim74-kaoriya-win32-20140504.zip」をダウンロードし、適当なフォルダに展開します。

> C:\Users\<アカウント名>\bin\vim74に展開

次に、システム環境変数のPathに以下を追加します。

;C:\Users\<アカウント名>\bin\vim74

なお、GUIのエディタでレシピを編集しても実行可能なため、必ずしもVimにする必要はありません。(好みの問題です。)

doskey

Windowsにもdoskeyというエイリアス機能があるので、Linuxライクなコマンドが使えるように変更します。

ホームディレクトリにcmd.aliasesというファイルを作成し、以下のような設定を入力します。

> %HOME%\cmd.aliases
pwd=cd
mv=move $*
rm=del $*
grep=find "$1" $2
diff=fc $*
cp=copy $*
cat=type $*
ls=dir /b $*
ll=dir $*
vi=vim $*
ps=tasklist $*

Consoleの[Edit]>[Setting..]をクリックすると、Console Settingにて以下の設定を行います。

  • シェル: Console>Shell
C:\Windows\system32\cmd.exe /K doskey /macrofile=%HOME%\cmd.aliases

例えば、「ll」と入力すると、dirコマンドの結果を見ることができます。

> ll
2014/05/17  02:59    <DIR>          .
2014/05/17  02:59    <DIR>          ..
2014/05/16  14:24    <DIR>          .chef
2014/05/16  14:24                13 .gitignore
2014/05/17  00:07                87 chef_run.bat
2014/05/16  14:24    <DIR>          cookbooks
:

これで、Windowsから直接Chefを実行する環境が整いました。

*1:2014/5時点で最新のものです。